
The following dialogs are invoked directly or indirectly from the Main
Menu:
Select the locks you wish to break and click Breaklock(s) or click Cancel at any time to cancel the operation and close the dialog. Note that breaking a lock is irreversible. The "Select All Orphans" button highlights all of the orphaned entries and the "Clear All" button de-selects the entries. For verification purposes, the "Select All Orphans" button does not highlight locks owned by active clients; these must be individually selected.


The user has a choice of the following algorithms:
| Algorithm | Description |
| Cubic / Advection | Cubic spline is applied to the data points temporally. Software looks for areas that can be advected. The advection component of the algorithm works best for weather elements that contain areas of zero value. |
| Cubic / NoAdvection | Cubic spline is applied to the data points temporally. Software gradually adjusts points from starting value to ending value without advection considerations. |
| Linear/ Advection | Linear calculations are applied to adjacent base grids temporally. Software looks for areas that can be advected. The advection component of the algorithm works best for weather elements that contain areas of zero value. |
| Linear/ No Advection | Linear calculations are applied to adjacent base grids temporally. Software gradually adjusts points from starting value to ending value without advection considerations. |

 Example of temporal editor range
bar visualization.
Example of temporal editor range
bar visualization.
The dialog controls the data presented in the temporal editor range visualizations. Absolute will display the absolute minimum and maximum values in the editor. Moderated will chop out the outlyers based on the given percentages for the minimum and maximum. The Standard Deviation choice includes those points within a certain number of standard deviations from the average.


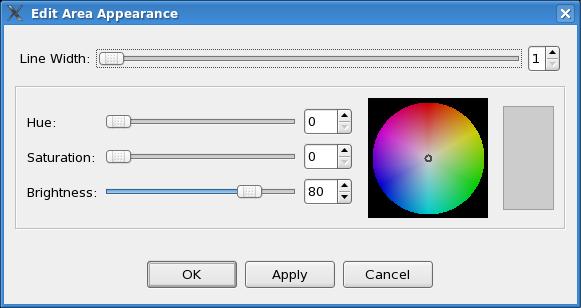
The user can choose the new color from the color selector as well as the line width.
The dialog displays the names of all modified Weather Elements. Choose Yes to save all elements and exit the GFE. Choose No if you do not want to save the elements before exiting the GFE.
At any time you can click Cancel to cancel the operation and close the dialog without exiting the GFE.

If you happen to have any temporary hazard grids active in your GFE
and attempt to exit, you may see a dialog that looks like this:

If you see this dialog, it means that you must save or manually
unload the temporary hazards weather elements before you can save the
"Hazards" weather element. If you select "No", the GFE will exit
without saving any of your modified grids. If you select "Cancel"
the operation will be canceled and leave the grid state unchanged.
There are built-in dependencies between the above options moving from left to right. This means that only Sources for the selected Type will appear. Similarly, only the Fields for the selected Sources and Planes for the selected Fields appear. This will aid you in selecting available grids from the many possible combinations.
The File menu allows you to save the selections you have made to a group, delete previously saved groups, or to load a previously created group.
The Edit menu allows you to select/deselect all available options or to start over by undoing the selections you have made thus far.
The Site can be selected from the menu bar.
After making your selections, click Load and Dismiss to load your selections and close the dialog, or click Cancel at any time to end the operation and close the dialog.
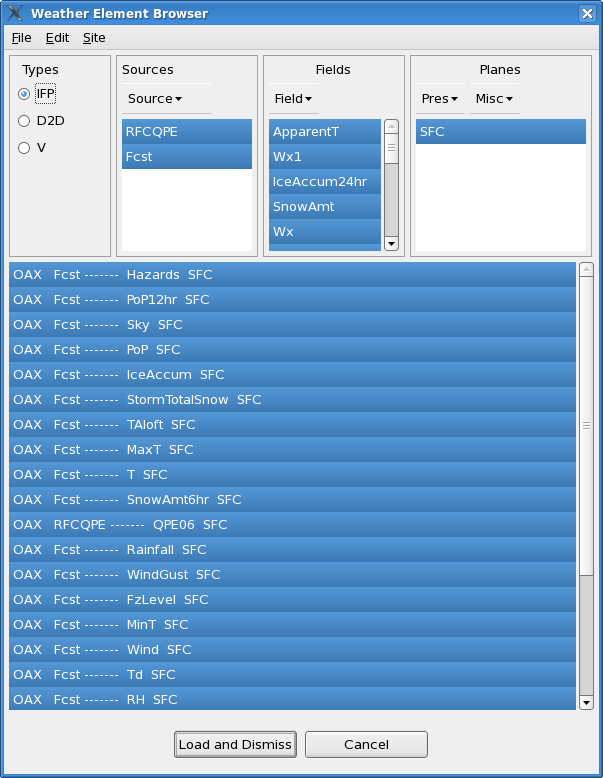
Saving a group of weather elements is done via the Weather Element Volume Browser. To make your own group, follow the steps below.
You can delete saved groups by choosing File-->Delete Weather Element Group which brings up the Delete Weather Element Group Dialog.


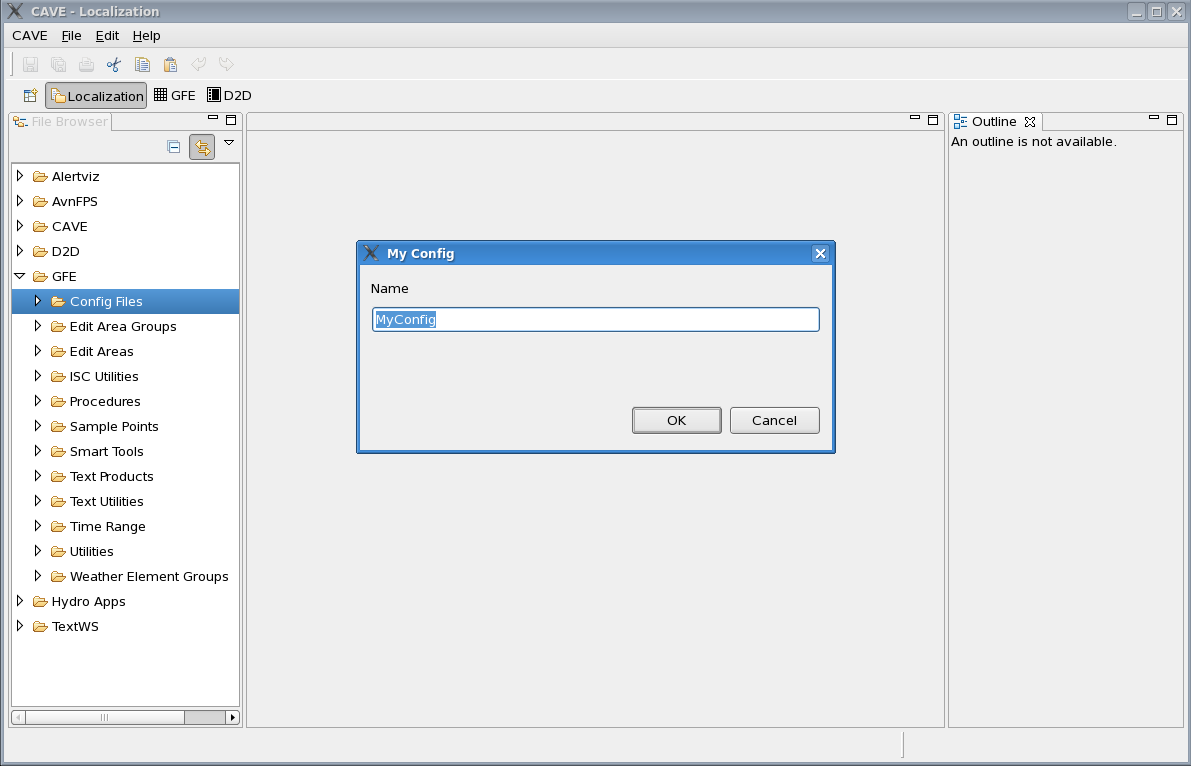
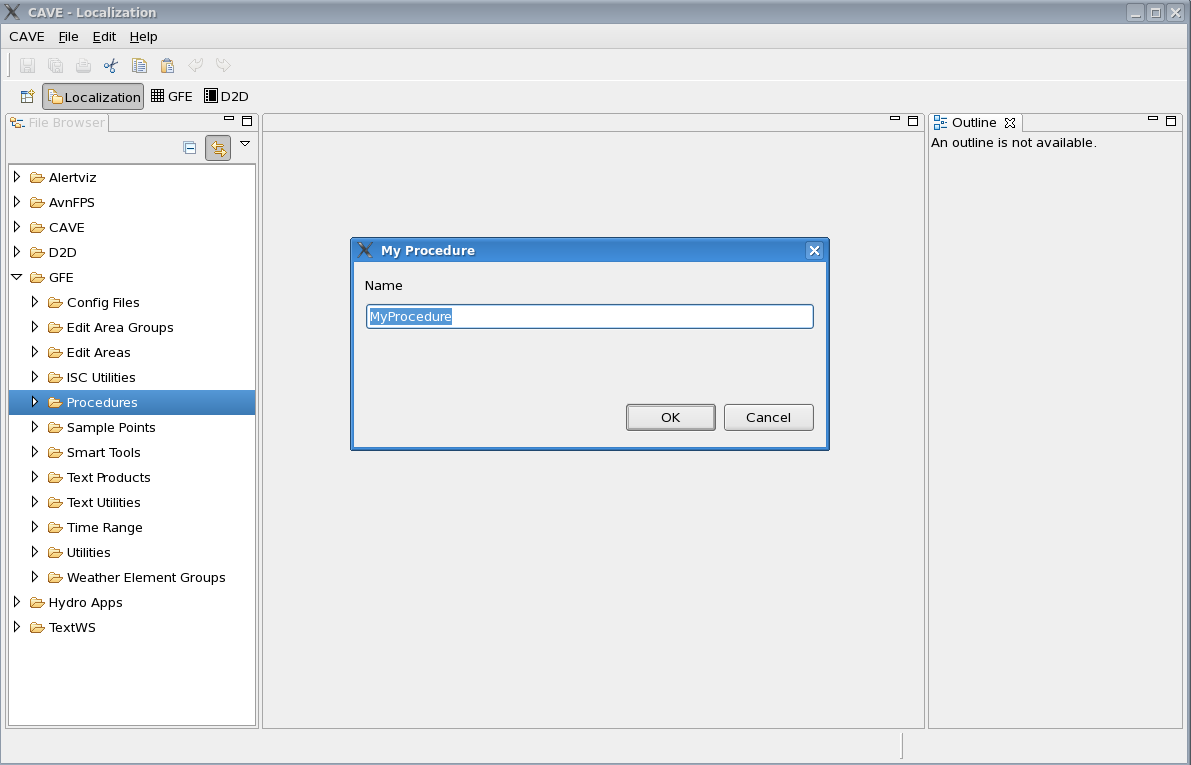
The Define Procedures Dialog opens the Localization perspective with the Procedures folder selected in the left column.
Choosing MB3-->New allows you to add a new procedure. A dialog will appear for you to enter the name of your new procedure. After clicking Ok, the Python editor will appear for you enter your procedure commands. A template is provided in the Python window with documentation in the Smart Script Class Library and Procedures section of the Smart Tools Training Guide.
NOTE: Procedures can be run in background mode from the command line. For instructions, see the runProcedure documentation.
The dialog displays the names of all available models and you choose the model you wish to copy from by clicking directly on the model identifier. If necessary, you can use the scroll bar at right to page through all the available models.
After making your selection(s) click OK or click Cancel at any time to cancel the operation and close the dialog.

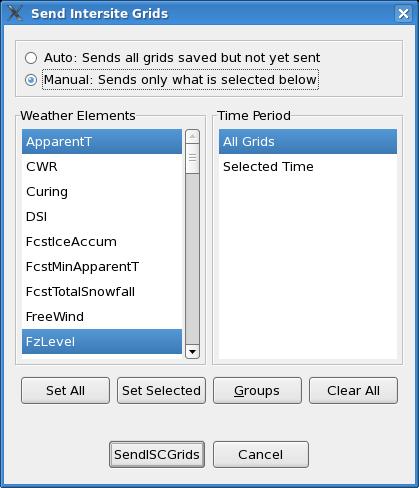
In manual mode, the user chooses the set of weather elements to send, which default to the currently loaded elements in the Fcst database, the time ranges to send, whether it be "All Grids", grids over the "Selected Time", or grids over a specific user-defined time range.
There are several convenient buttons used to select the set of
Weather Elements. By default, the loaded weather elements are selected.
The "Set All" sets all weather elements to on, the "Clear All" sets all
weather elements (and sites) to off, and the Groups button brings up a
menu allowing the forecaster to choose a predefined Weather
Element Group. The "Set Selected" option sets the weather
elements and time range to that currently selected in the GFE Grid
Manager.

In automatic mode, EDEX keeps track of what ISC grids have been sent since the grids were last modified. When Send ISC is chosen with automatic mode, EDEX sends all grids that were previously modified but haven't yet been sent via ISC.
The dialog contains three columns. The first column is the Domain. The user selects which domains that he/she wishes to bring into the ISC database for this one-time request. As the user selects and deselects domains, the entries in the second column, Grid Source, will change. The Grid Source contains information about the "known" EDEX servers that are running the desired domain. The "best" guess selection for each domain is automatically chosen, but may not be the correct choice. For example, if you were down and someone else was backing you up, and then you bring up your system and want your own grids into the ISC database, the default choice would go to the primary site for those grids which is yourself. That won't work -- instead the forecaster must choose the site and server that was used to backup your site.
The information in the second column details the Domain, then the server. The format of the information for the server is the host/port@site where site is the configured mhs id. Don't get confused if the domain is your own, but the site is someone else. This indicates that there is another server on the network that is running your domain. You will frequently see multiple choices whenever a site is preparing for service backup, or recovering from service backup. Simply select one of the choices for each Domain to determine which server to which to make the ISC request.
The third column is the Weather Element list. It contains all of the weather elements you normally receive via ISC. This list defaults to all elements.
Pressing the "Make Request" button will send a request to the chosen EDEX servers, which will process the requests and send you back the specific ISC data in the normal fashion.

If you are requesting ISC data from a site with a different office
type than your own (such as an RFC requesting data from a WFO), then
the weather element you request will have the remote office type as
part of its name. For example if you are at a WFO and
want to request QPF. Requesting QPF will work from any WFO,
but you must request QPFrfc to request the data from an
RFC. In a similar fashion, if you are at an RFC and want
QPF from another RFC, simply request QPF. But if you want QPF
from an WFO, you must choose QPFwfo.
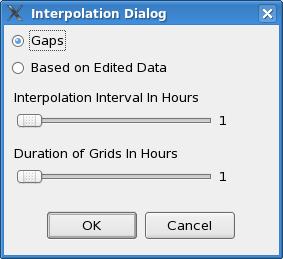
The user may choose an interpolation interval in hours. The scale varies from the minimum size of the time constraints for the selected weather elements up to 24 hours. If the user chooses 1, then a grid will be created each hour (or the minimum allowable time for the weather element). If the user chooses 3, then interpolated grids will be created every 3 hours.
The user may choose the duration of the grids in hours. The scale varies from the minimum size of the time constraints for the selected weather elements up to 24 hours. If the user chooses 1, then each interpolated grid will be 1 hour in length (or the minimum allowable time for the weather element). If the user chooses 3, then each interpolated grid will be 3 hours in length if possible.
Note that the "Interpolation Interval In Hours" and the "Duration of Grids in Hours" may not always appear on the dialog, depending upon the time constraint characteristics of the weather elements you have selected. The "Duration of Grids in Hours" will not appear when selecting a weather element in which gaps are permitted, or when weather elements are selected with differing allowable durations. The "Interpolation Interval in Hours" will not appear when multiple weather elements are selected and their repeat interval time constraint are not equal to each other.
The default values of the interpolation interval and duration may be set in the gfe configuration file. See the Interpolation Dialog Defaults section.
The user may choose an creation interval in hours. The scale varies from the minimum size of the time constraints for the selected weather elements up to 24 hours. If the user chooses 1, then a grid will be created each hour (or the minimum allowable time for the weather element). If the user chooses 3, then grids will be created every 3 hours.
The user may choose the duration of the grids in hours. The scale varies from the minimum size of the time constraints for the selected weather elements up to 24 hours. If the user chooses 1, then each created grid will be 1 hour in length (or the minimum allowable time for the weather element). If the user chooses 3, then each created grid will be 3 hours in length if possible.
Note that the "Creation Interval In Hours" and the "Duration of
Grids
in Hours" may not always appear on the dialog, depending upon the time
constraint characteristics of the weather elements you have
selected.
The "Duration of Grids in Hours" will not appear when selecting a
weather
element in which gaps are permitted, or when weather elements are
selected
with differing allowable durations. The "Creation Interval in
Hours"
will not appear when multiple weather elements are selected and their
repeat
interval time constraint are not equal to each other.
Any existing grids within the selected time range will be removed
during this operation.
The default values of the create from scratch interval and duration may be set in the gfe configuration file. See the Create From Scratch Dialog Defaults section.

After making your selections click OK. At any time you can click Cancel to cancel the operation and close the dialog.

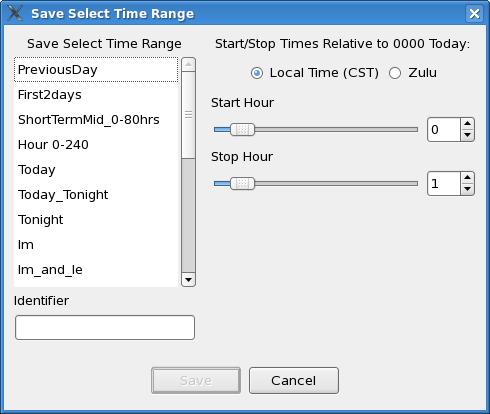
| Current System Time | Start Hour | End Hour | Mode | Calculated Defined Time Range |
| Tuesday 900am, 1500z 6/14 | 0 | 6 | LT | Tuesday midnight to Tuesday 6am local time |
| Tuesday 900am, 1500z 6/14 | 0 | 6 | Zulu | 6/14 0000z to 6/14 0600z |
| Tuesday 900am, 1500z 6/14 | 18 | 49 | LT | Tuesday 6pm to Thursday 1am local time |
| Tuesday 900am, 1500z 6/14 | 18 | 49 | Zulu | 6/14 1800z to 6/16 0100z |
Click "Save" to define the new time range.

The dialog displays the names of all modified Weather Elements. Choose the Weather Elements you wish to save and click Save Forecast.
The "Send ISC on Save" option can be enabled to also send out your ISC grids for the modified weather elements. See the Intersite Coordination User's Guide for more details on Intersite Coordination of Grids.
At any time you can click Cancel to cancel the operation and close the dialog.

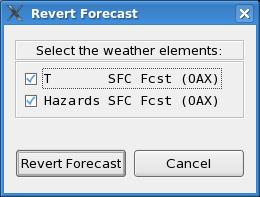
If you are working with Hazards grids, you may encounter a dialog
that looks like this:

When you see a Save Dialog that looks like this, it means that you
have temporary hazard grids active in the GFE. These temporary
grids must be merged manually before they can be saved. If you
select "Save Weather Element(s) at this point, all of your modified
weather elements will be saved, except "Hazards". To save
"Hazards", you must first select "Hazards->MergeHazards" from the
GFE main menu bar. Selecting "Cancel" will not save any weather
elements and leave the state of the grids just as they were before you
attempted to save.
At any time you can click Cancel to cancel the operation and close the dialog.
There are several convenient buttons used to select the set of Weather Elements. By default, the loaded weather elements are selected. The "Set All" sets all weather elements to on, the "Clear All" sets all weather elements (and sites) to off, and the Groups button brings up a menu allowing the forecaster to choose a predefined Weather Element Group. The "Set Selected" button will select those Weather Elements that are selected in the Grid Manager.
After making your selections click Publish or click Cancel at any time to cancel the operation and close the dialog.

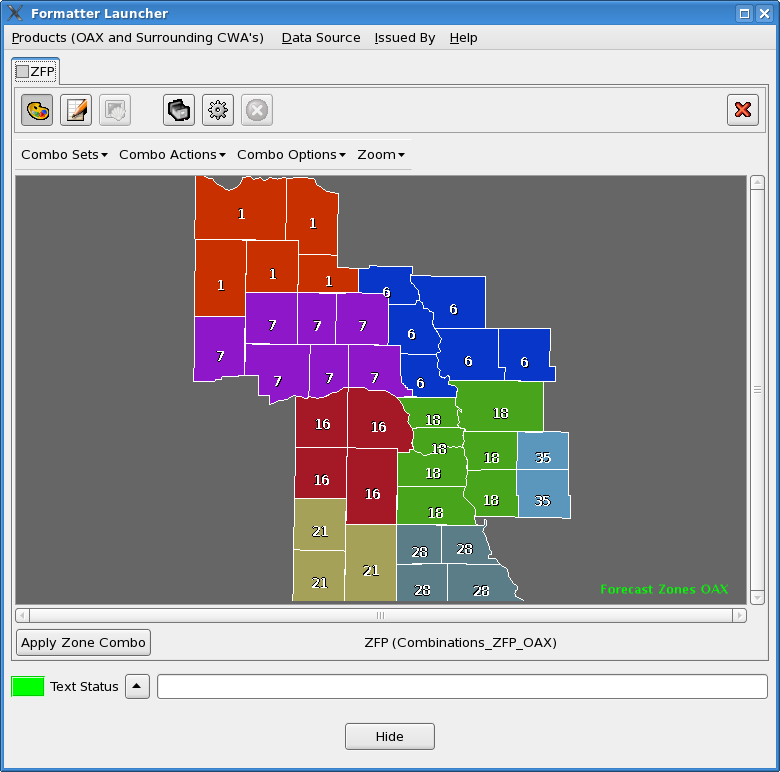
Each product you can generate is listed in the dialog. To learn
how to add your own product selections or change the entries currently
in the dialog, refer to the Text
Formatter User's Guide.
By default, product generation will use the Official database for
the data source.
The data source for product generation can be changed to use the Fcst
or the ISC database using the "Data Source" menu. The default
may also be specified in the Definition section of each product
formatter using the Definition['database']
entry.
By default, product generation will run on the EDEX platform,
rather than on the local platform. The forecaster may
change this from the "Processor" menu.


 The "start" button flashes
when
the process is running. If the process is still pending,
then the button does not flash. Clicking with MB1 will force the
process to begin, even if it will exceed the maximum configured number
of background processes.
The "start" button flashes
when
the process is running. If the process is still pending,
then the button does not flash. Clicking with MB1 will force the
process to begin, even if it will exceed the maximum configured number
of background processes. The "kill" button is used to abort or kill a running process, or delete
the process from the pending queue if it isn't running yet.
The "kill" button is used to abort or kill a running process, or delete
the process from the pending queue if it isn't running yet. The
"terminal" button, when pressed, will open up a window that contains
the standard output and standard error information from the process.
The terminal only holds a configurable number of lines so processes
that produce a lot of output may not have all of their output contained
in the dialog. The window may be opened up at any time, while it is
pending, running, or finished. Some log messages may not be written to
the terminal window unless the .logPref file is correctly
configured. The terminal button is only available for
server processes after the process has finished.
The
"terminal" button, when pressed, will open up a window that contains
the standard output and standard error information from the process.
The terminal only holds a configurable number of lines so processes
that produce a lot of output may not have all of their output contained
in the dialog. The window may be opened up at any time, while it is
pending, running, or finished. Some log messages may not be written to
the terminal window unless the .logPref file is correctly
configured. The terminal button is only available for
server processes after the process has finished.
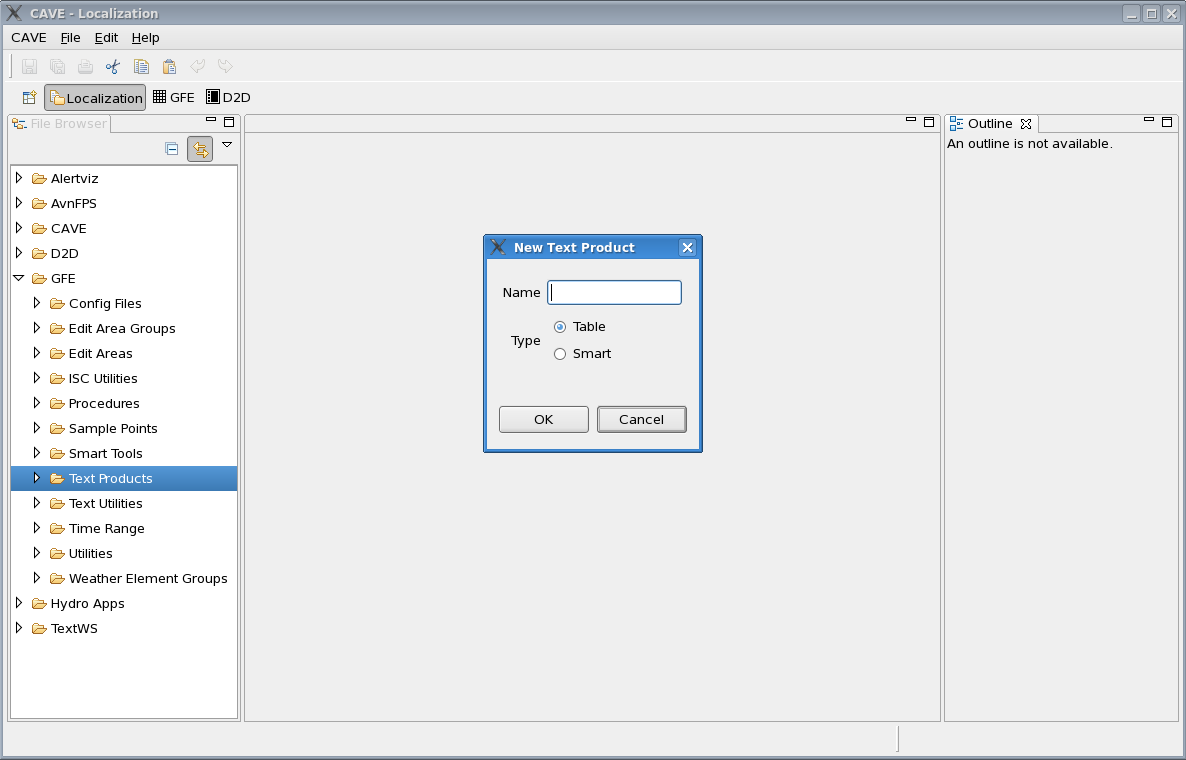
The Define Text Product Dialog is opened by selecting GFE-->Define Text Products.
This opens the Localization perspective with TextProducts folder selected. Within
the Text product folder are all existing text products.
Choosing MB3-->New on the selected TextProducts folder
allows you to add a new product to the list. A
dialog will appear for you to enter the name of your new product and the
product type. After clicking Ok, the Python editor will appear for you
enter your product definition. A template is provided in the Python
window with documentation explaining the definition.
At any time, you can click Cancel to cancel the operation and close the dialog.

A sample point can be added to the Spatial Editor when the Sample Tool is active by clicking on a location in the display. To save the set of sample points displayed in the Spatial Editor as a named Sample Set, type a name in the Identifier box and click "Save." You may Cancel the dialog at any time.
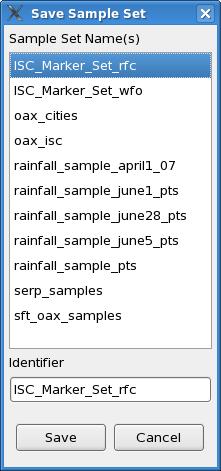
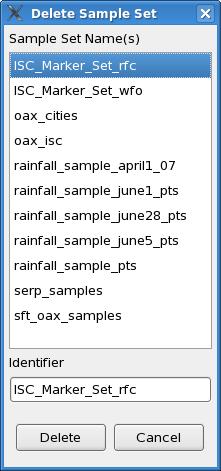
To delete a saved Sample Set, click on its name which will appear in the Identifier box and click "Delete." You may Cancel the dialog at any time.

The About Dialog provides general information about CAVE.
