Edit Action Button-3 Pop-Up Menu
Creating A New Tool
Description of Tool Arguments
Description of VariableList
Additional Smart Tool Methods
Creating a Smart Tool from an
Existing
File
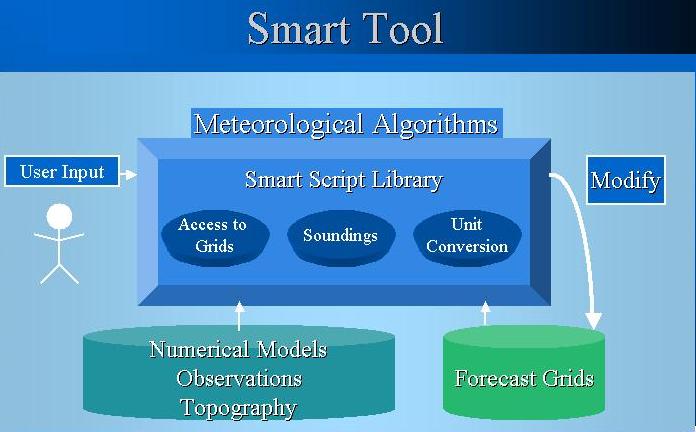
Smart Script Class Library
In the following sections, we will see how to create and modify
tools and procedures through the Edit Action Dialog. We will
demonstrate
the use of the Smart
Tool Framework and Smart Script Library through a set of exercises
and tutorials. The following sections assume that you have
knowledge of Python and its Numpy extension which are
covered
in the GFESuite Python Tutorial and Programming
Guidelines.
Exercise
Tool-1 -- Creating a New Tool
Weather elements do not need to be loaded in the GFE to be accessible
to Smart Tools. The weather element is assumed to come from the Fcst
database
unless you specify a more complete name of the form:
elementName_level_siteID_type_model_modeltime
The "type" is an empty string for GFE Fcst data and is "D2D" for D2D data.
MaxT_SFC_BOU__NAM12_Mar2912
:
gets MaxT from the March 29 12Z NAM12 run created by GFE
initialization.
MaxT_SFC_BOU_D2D_NAM12_Mar2912
: gets MaxT from the March 29 12Z original NAM12 run from D2D.
If you omit the "modeltime", the most recent model run will be selected. For example:
MaxT_SFC_BOU__NAM12
:
gets MaxT from the most recent NAM run created by GFE initialization.
MaxT_SFC_BOU_D2D_NAM12
:
gets MaxT from the most recent original NAM12 run from D2D.
rh_MB300_BOU_D2D_GFS40
:
gets rh from the most recent original GFS40 run from D2D.
For a list of D2D elements and descriptions click here.
If you request a weather element value other than the one you are editing, it is possible that the system will encounter multiple corresponding grids. For example, if you are editing a 6-hour QPF grid, there may be multiple Wind grids that fall within the QPF time range. In this case, the system will automatically return the time-weighted average value of the multiple grids. This means that the values in a 3-hour Wind grid will be weighted 3 times more heavily than those in a 1-hour grid when calculating the average value. Only the portion of the grid that overlaps the edited grid will be counted in the time weighting. Time-weighted average for a Weather-type element is defined as the combination of all weather values encountered.
Smart Script Class Library: For more advanced methods of accessing grids in your Smart Tool, see the section below on the Smart Script Class Library. In this library you will find more sophisticated processing. For example, if you are not satisfied with a time-weighted average of grids over a time range, you can get a sum, max/min or even the actual grid values themselves. Or, if you do not know ahead of time which model you will want to access, you can create a call at execution time to get the grids you want.
There are many methods for working with time ranges. Here's the basic methods:
The start and end times are TimeRange objects.
Here's an example of creating your own time range relative to the given GridTimeRange:
def execute(self, GridTimeRange):
import TimeRange
start = GridTimeRange.startTime()
end = GridTimeRange.endTime()
timeRange2 = TimeRange.TimeRange(start - 24 *3600, end - 24
*3600)
T0 = self.getGrids("Fcst", "T","SFC", timeRange2,
noDataError=0)
if T0 is None:
self.noData()
|
T
|
Multiply QPF by
|
|---|---|
|
< 20
|
18
|
|
between 20 and 25
|
14
|
|
over 25
|
10
|
Exercise
Tool-3 -- Using VariableLists
Creating
VariableLists "On-the-fly"
ToolType = "numeric"
WeatherElementEdited = "variableElement"
ScreenList = ["SCALAR"]
from numpy import *
import ProcessVariableList
import SmartScript
class Tool (SmartScript.SmartScript):
def
__init__(self,
dbss):
SmartScript.SmartScript.__init__(self, dbss)
def
preProcessTool(self):
# This is necessary so that we show the
# dialog once per tool, not once per grid.
self._dialogShown = 0
def
execute(self,
variableElement_GridInfo):
if self._dialogShown == 0:
minval=variableElement_GridInfo.minLimit()
maxval=variableElement_GridInfo.maxLimit()
variableList=[ ("Modify value to:",0,"scale",[minval,maxval])]
varDict = {}
processVarList = ProcessVariableList.ProcessVariableList(
"Title", variableList, varDict, parent = self.eaMgr().root())
status = processVarList.status()
if status != "Ok":
self.cancel()
self._modifyValue = varDict["Modify value to:"]
self._dialogShown = 1
variableElement = self._empty + self._modifyValue
return variableElement
Reserved
Methods
Creating
Your Own Methods
Naming
Conventions
These conventions are important to follow not only for clarity, but to insure that you do not inadvertently override an existing library method by giving your method or variable a duplicate name.- User-defined Smart Tool and Procedure methods and variables, which need to span multiple methods, are preceeded by an underscore: e.g self._modifyValue, def _myMethod.
- SmartScript library methods do not have a preceeding underscore: e.g. self.getGrids.
- The Reserved methods, e.g. execute, preProcessTool, do not have a preceeding underscore.
- Utility methods (see Utility section), are preceeded by an underscore.
Notice that all the Smart Tools we've created begin with the following lines:
def execute(self, T):Notice that we used the prefix, "self." to tell the system that this method belongs to my class (which inherited it from the SmartScript class). Procedures begin in a similar way with a class, Procedure, instead of Tool, and the same methods are available to them.
degreesK = self.convertFtoK(T)
The SmartScript class contains methods for:
- accessing grids directly (This means that it is not necessary to list all the grids you need in the Smart Tool argument list.),
- creating a sounding and accessing values from it based on elevation,
- error handling,
- unit conversion,
- "procedure" commands e.g. copy, interpolate, createFromScratch, accessing named time ranges and named edit areas, and calling Smart Tools.
Now, try your hand at writing a tool to create a new "TempRH" element. Select your own model name and use the equations in the RH_Tool (found in the Edit Action Dialog). When you create your tool, select "None" for the element edited. Use the "ScreenList" that appears in the tool template to specify how it will be displayed within the Edit Action Dialog. Instead of returning the resulting grid, your tool will call the "createGrid" command.
Now you should be able to access this element in other tools with the "getGrids" command using your model name, element name, and "SFC" for the level. For example:
RH = self.getGrids("TempModel","TempRH", "SFC",GridTimeRange)
Click here for Answer to Exercise SmartScript-5.
Use the SmartScript method "getIndex" to assign weather values based on PoP according to the following criteria:
Click here for Answer to Exercise SmartScript-6.- where PoP < 15, assign "<NoCov>:<NoWx>:<NoInten>:<NoVis>:"
- where PoP >=15 and PoP < 35, assign "Chc:R:-:<NoVis>:"
- where PoP >=35 and PoP < 55, assign "Sct:RW:m:<NoVis>:"
- where PoP >= 55, assign "Wide:R:+:<NoVis>:"
Here is an example of a Discrete smart tool that converts all gridpoints that have a value of <None> to "BL.W":
def execute(self, Hazards):
"Sample tool to put
in Blizzard Warnings (VTEC code BL.W)"
# Determine new value
grid, key = Hazards
indexBlizzard =
self.getIndex("BL.W",
key)
indexNone =
self.getIndex("<None>",
key)
mask = equal(grid,
indexNone)
grid = where(mask,
indexBlizzard,
grid)
# Return the new
value
return grid, key
Use the SmartScript method, "wxMask()" to assign PoP values based on Wx coverage according to the following criteria:
- where coverage is "<NoCov>", assign 0
- where coverage is "Chc", assign 25
- where coverage is "Sct", assign 55
- where coverage is "Wide", assign 80